Custom Product Pages on Wix: Part 1 - Product Page Setup
- Michael Nzeribe

- May 6, 2025
- 8 min read
Prioritizing the look and feel of your product page is crucial, as it is the decision point where customers get to know more about the product features and decide whether to buy or not.
A well-designed product page can help customers make more informed decisions by providing comprehensive information about products and allowing customers to evaluate the products based on their needs, which can lead to a higher conversion rate.
The native WIX product page provides a good foundation but there are some cases where the features and functionalities might not align with your needs. Perhaps you want to customize the layout or how images are displayed, add a slider feature, add images or videos to enhance product presentation, and more. Then, you need to customize the product page.
This article will walk you through the step-by-step process of how to customize your product page from scratch.
Want to learn more? Ready to dive deeper into Wix and Velo? Take your skills to the next level with our comprehensive 'Velo for Beginners' course on Udemy. Enroll today to uncover the intricacies of Wix and Velo.
Need help with your site? The Wix Wiz team is at your side. Schedule a one-on-one consultation or have the entire team onboard with our development and support plans.
Additionally, if you want to enhance your checkout experience, check out our guide on How to Create a Customized Checkout Page by Hijacking the Checkout Button in Wix. This will help you take full control of your store’s checkout process and improve conversions.
Setting Up the Basic Foundation of a Custom Product Page
To set the foundation of your customized product page, the first thing to do is to consider the type of customization features and functionality you want to implement. This will provide you with a clear roadmap of what you want to build.
In this tutorial, we will replicate the look and feel of this customized page on Etsy (image attached below) using Wix. We will implement the different functionalities on this page, such as the Slider feature, Add to Favorite, Add to Cart, Reviews, and more.

Now that we have a clear roadmap of what we want to build, let’s get started.
Implementing Features in the Custom Product Page Template
After setting up the basic foundation of what we want to build, the next task is to implement each of the features in the template from the simplest to the most complex until we get the desired look and feel of what we want to create.
The main image is the first feature we want to implement on the product page.
To get started, ensure you have the ‘Wix stores’ installed.
In case you're yet to install it, follow these steps:
Step 1: Navigate to the ‘Add Apps’ and search for ‘Wix Stores.’

Step 2: Select the ‘Wix Stores’ option. Then, click ‘Install.’

After installing the Wix store, navigate to the pages section and select ‘Product page.’ This is the page we want to customize.

Notice that the app is like a closed box, which limits our ability to customize or add more functionalities to this page.
The only way to make some changes to the page is by using the 'settings’ option, which might be inefficient if you need to add some additional functionality, maybe because you want to make some kind of calculation or you want to display things differently. You need to customize the product page completely.
How to Completely Customize a Product Page
There are two ways to customize the product page, which are:
Native Product Page: This approach allows you to create a custom product page by building it on the same native product page. This involves hiding the old section on the native product page and creating a new section with your preferred customization feature on the page.
In this approach, you can directly access the product data using the `getProduct()` API rather than using a dataset or code, although this approach can still be used if necessary.
Dynamic Product Page: This allows you to completely customize the product page from scratch rather than using the same native product page. This is useful in cases where you also want to customize the shop page or build a custom catalog without using the Wix store.
In this approach, you can access the product data via dataset or code since there are no native widgets on the page. Using this approach has the advantage of potentially speeding up navigation.
If you prefer the native product page, you can build your customized product page on it and include the necessary features and functionalities. However, if you want a separate, customized page, the dynamic product page approach offers more flexibility and can potentially improve navigation speed.
How to Use The Native Product Page
Follow these steps to use the native product page option:
Step 1: Open the native product page.
Step 2: Click the ‘Add section’ button to add a section to the product page.

Step 3: Click the ‘Blank section’ button to add a blank section.
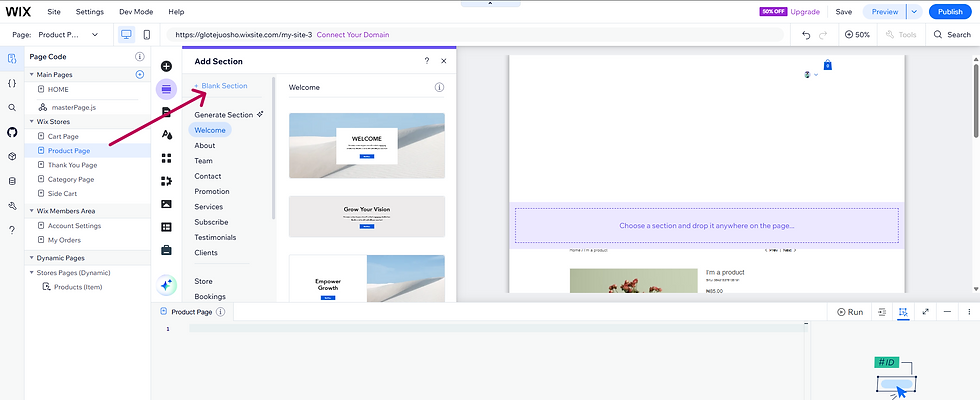
This section is the new product page we want to customize based on our needs. Then we can hide the old section.
Step 3: Click the Old section and navigate to the code editor. Then click the ‘Collapsed’ checkbox.

Step 4: Click the ‘Preview’ button to view the changes.

Notice we can only see the new section while the old section is no longer visible.

Now, let’s navigate back to the editor and add more elements to the new section.
Remember the first feature we want to implement is the main image.
Step 5: Click the ‘Add Elements’ button, navigate to the image button, and select ‘Free from Wix.’ This will add a new image to the section.

Note: This is not our product's main image. It is just a placeholder.
Step 6: Resize the image. This is to ensure that the main image we want to add is similar to the main image on Etsy.

The next step is to add our main image product using the `getProduct` API.
Note: Ensure your ‘DevMode’ is turned on.
Step 7: Change the ID of the old product page. This represents the ID we will be targeting using the Velo code.

Step 8: Change the image ID to a more unique name. This makes it easier to remember once we start coding.

Step 9: Dynamically add the main image using the `getProduct` API. `getProduct` is a function that retrieves product information.
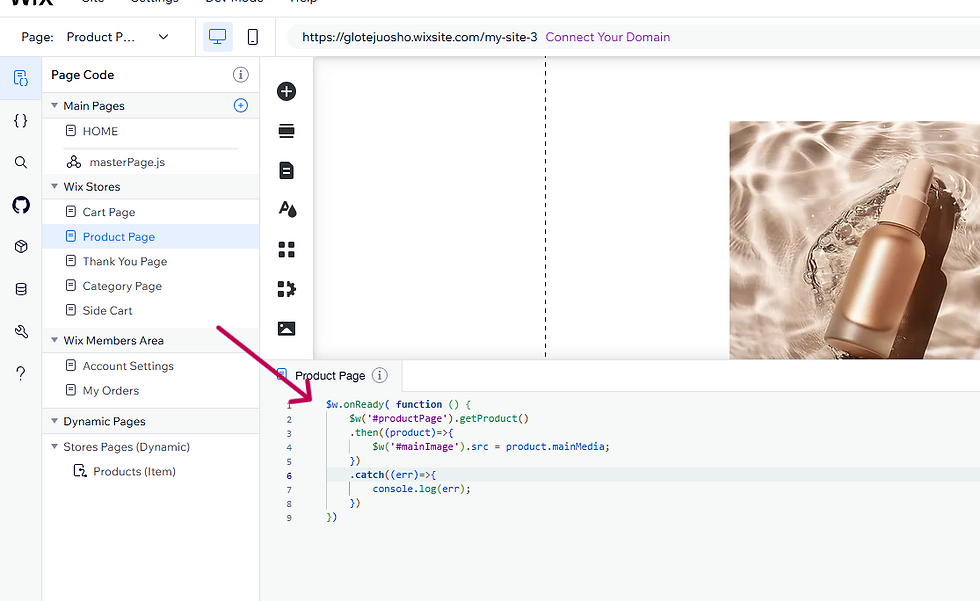
The `onReady` function ensures the page loads before executing the code.
The `getProduct` function is attached to the product page to retrieve the product’s information.
Since the only product information we want to retrieve is the image, the `then` callback function is programmed to display the product image only by selecting the main image using its ID and then using the `src` attribute to set the image location to the product image by using the `product.mainMedia`.
This automatically replaces the old image with the product image.
Step 10: Click the ‘Preview’ button to view the changes.

Notice the image has been added dynamically!
If you want to use the second approach by using the dynamic pages, let's get into it!
How to Use Dynamic Pages
A dynamic page refers to a page in Wix that is linked to a collection so that each item in the collection is displayed dynamically on a single page. The items are connected to the collection via a dataset.
How to Create a Dynamic Page
Follow these steps to create a dynamic page for the Wix product page:
Step 1: Turn on ‘Dev Mode.’

Turning on the ‘Dev Mode’ gives us access to the behind-the-scenes collections in Wix stores, such as the Wix Stores collection.
Step 2: Navigate to the ‘Wix App Collections’, and select ‘Products.’ These are the fields of a Wix product.

Step 3: Click the three dots option next to the ‘Products.’ Click ‘Add dynamic page.’

Step 4: Select ‘Item page.’ Then click ‘Add to site,’ which will automatically create dynamic pages on our websites that correspond to the items in the product collection.

Something like this should appear on your screen.

This is not the desired layout we want for the product page we want to create but it can still be used to get the look and feel we want for our product page.
A quick side note: If you navigate to your dashboard, you will notice that you can access all of your products from the dashboard.

One of the things we want to do in this tutorial is to make sure that you can still manage your products completely through this dashboard. I.e., each of these fields in this dashboard that corresponds to one of the fields in the product dataset needs to be able to be edited through the dashboard.
To make the changes reflect on the product page we want to build.
So we still want to use this dashboard to add and edit products and also make the changes made here be reflected on our custom product pages as if we are using the Wix app.
Now, let's head back to the product page.
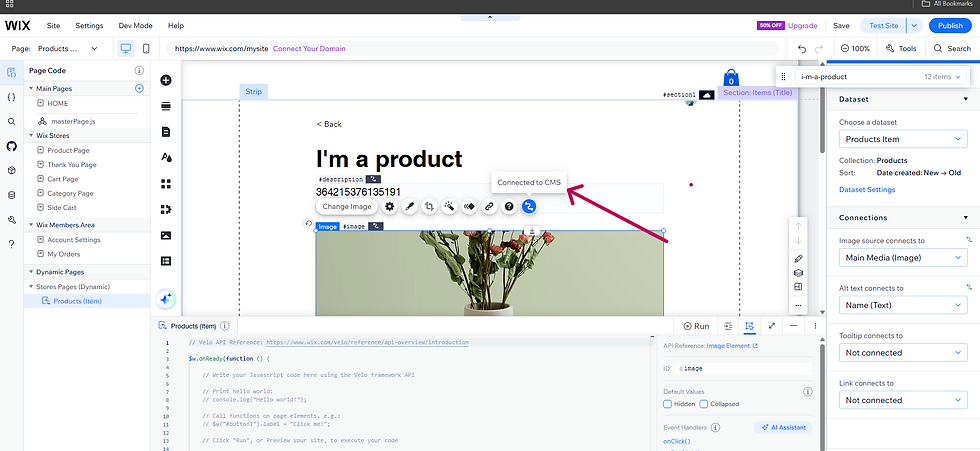
Notice that all the existing elements on the page are connected to the product item dataset by default. We need to disconnect this connection.
Follow these steps to disconnect the elements on the page:
Step i: Remove all the elements on this page except the image.

Step ii: Click the ‘Connect to CMS’ button, navigate to the dataset section on the left-hand side, and click ‘Not Connected.’ This will automatically disconnect the image from the dataset.

This should change to the default Wix image.

The next step is to connect this image to the dataset by ourselves.
How to Connect Elements on a Page to a Collection
There are two ways to connect elements on a page to a collection.
This includes:
1. No code connection: This process involves using the ‘Connect to CMS’ icon to connect elements on the page to your collection.
2. Code connection: This involves writing code to connect elements, which gives some flexibility.
If you're new to Wix Collections and Datasets, check out our detailed guide on How to Utilize Wix Collections and Datasets to Power Your Websites With Data to better understand how to organize and manage your data effectively.
To connect the image to the dataset using code, follow these steps:
Step 1: Navigate to the code editor. Ensure you have turned on the `devmode`.
Step 2: Add a `onReady` event listener to the dataset. This ensures that the dataset is ready.
The dynamic dataset has an ID of `dynamicDataset`, you can change the ID if you wish.
Then, the `onReady` event listener is added to the dynamic dataset. This ensures that the dataset is ready before any functionality is executed.
The `product` variable then targets the `dynamicDataset` ID and gets its current item using the `getCurrentItem` function.
Step 3: Connect the image dynamically using code.
The `src` attribute is added to the image ID of `#image` which sets the image location to the dynamic dataset media.
Step 4: Click `Go to Preview` to preview the live changes.
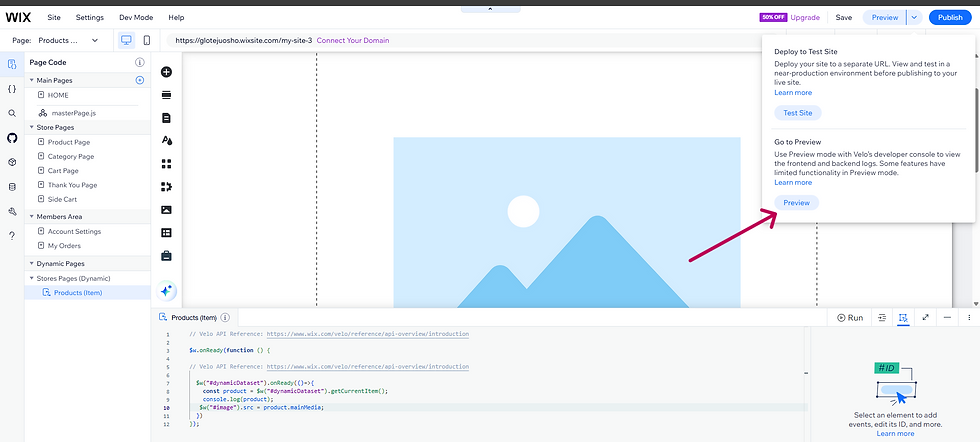
Notice the main image has been added dynamically!

These are the two ways you can connect items on the page to a collection when creating your custom product page. Both approaches are valid depending on the functionality you want to implement; the no-code connection provides a simple way to connect items, while the code connection gives you more flexibility and allows you to add more functionality.
Conclusion
Customizing your product page with special features can make your Wix store look better and work better for customers. A well-designed page helps shoppers find what they need easily and makes them more likely to buy.
In this guide, we showed you how to build a custom product page on Wix, similar to an Etsy product page. We started the implementation process from the simplest by working on the main image in the template we wanted to build.
Then we installed Wix Stores, created a dynamic page, and connected the main image element to a dataset using Wix Code.
But there’s more! In our next article, we’ll show you how to add more pictures and media using a repeater to make your product page even better. Stay tuned!
Want to learn more? Ready to dive deeper into Wix and Velo? Take your skills to the next level with our comprehensive Velo for Beginners course on Udemy. Enroll today to uncover the intricacies of Wix and Velo.
Need help with your site? The Wix Wiz team is at your side. Schedule a one-on-one consultation or have the entire team onboard with our development and support plans.
Comments